
📱 Omadroid
An Omarchy plugin to view and control an Android phone right from the bar, using scrcpy and ADB.
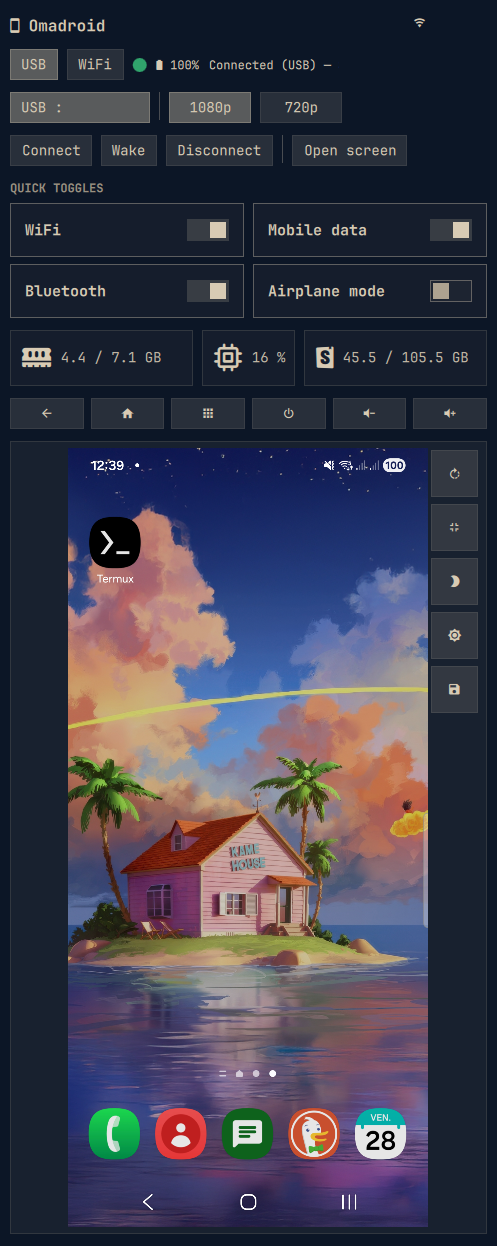
The widget shows a 📱 icon in the bar. Clicking it opens a panel:
- Top of the panel — configuration (connection mode USB / WiFi, WiFi IP, scrcpy window size, Connect / Wake / Disconnect buttons, status).
- Bottom of the panel — a preview of the phone screen + an Open screen button that launches the interactive scrcpy window.
The status line shows the connection type, device model and battery level, with a colored dot (green = USB, orange = WiFi, red = disconnected). The last used WiFi IP and mode are remembered between sessions.
Unlocking the screen is done physically (fingerprint / PIN) on the device. The Wake button turns the screen on so the preview shows up.
🔒 Security
- USB is the default transport (most secure — no network traffic).
- WiFi is opt-in and must be enabled manually in the panel. It uses the
standard ADB TCP/IP port
5555. - No network server. The plugin does not bind any HTTP/TCP listener; the preview is a local screenshot file read from a private per-user directory. The previous HLS live-streaming feature has been removed.
- Private runtime state. All state, config and the preview image are written
to
$XDG_RUNTIME_DIR/omadroid, created as a0700directory owned by the user (ownership/permissions/non-symlink verified at runtime; no/tmpfallback and no predictable world-writable path). - Descriptor-based, fsynced writes. All file output goes through a small helper
(
scripts/omadroid-io.py) that writes to anO_EXCL/O_NOFOLLOW0600temp file,fsyncs it, and atomicallyrenames it into place. Read paths are opened withO_NOFOLLOWand bounded to a fixed byte ceiling; the config file is read and parsed the same way (nosed -i/ append / raw redirection). - No re-reading of mutable state from disk in the UI. The panel reads command
output directly from each
Process's stdout (StdioCollector) rather thanFileView-watching state files, so a predictable path can never be swapped under it to inject data. - Only our own scrcpy is killed. The launched scrcpy is tracked by PID (written
via the fsynced helper). Disconnect kills exactly that child — after verifying
/proc/<pid>/commisscrcpy— instead of a blindpkill -x scrcpythat could hit unrelated instances. - Input validation. Device serials, WiFi IPs, ports, key names and swipe
coordinates are validated against strict formats before being passed to
adb. Device-supplied strings (model, SSID, RSSI, …) are length-capped and JSON-escaped. - Bounded operations. Every
adbinvocation runs under a timeout, and large command output/streams are capped (head -c). The preview PNG is captured into a bounded temp file and validated (magic bytes + size) before it replaces the displayed image.
🛠️ Prerequisites
| Tool | Install (Arch / Omarchy) |
|---|---|
adb |
sudo pacman -S android-tools |
scrcpy |
sudo pacman -S scrcpy |
On the phone:
- Enable Developer options (Settings → About phone → tap Build number 7 times).
- Enable USB debugging (Settings → Developer options). This is required for ADB/scrcpy to talk to the phone at all — nothing works without it.
- On Android 11+, also enable Wireless debugging if you plan to use WiFi mode without the USB bootstrap.
- Accept the ADB authorization prompt on first USB connection.
WiFi mode (optional — less secure than USB):
- The phone and the computer must be on the same Wi-Fi network.
- For the first WiFi connection, keep the phone plugged in over USB: the
plugin enables ADB-over-TCP (
adb tcpip 5555) through the USB link, then switches to WiFi. After that you can unplug and reconnect over WiFi using only the phone IP. - Use a stable IP (static lease or DHCP reservation) so the IP does not change between sessions. If it changes, just update the IP field in the panel.
- If your phone runs Android 11+, you can also pair via Wireless debugging (Settings → Developer options) instead of the USB bootstrap.
Quality (optional): Omadroid already launches scrcpy with good defaults
(--max-size 1080 --video-bit-rate 16M --max-fps 60). To override or add
scrcpy flags, export SCRCPY_OPTS in your shell. The plugin appends it to the
command it builds.
# bash  → add to ~/.bashrc
# zsh   → add to ~/.zshrc
export SCRCPY_OPTS="--max-fps 60 --video-bit-rate 8M"
Note: the variable above only reaches the plugin if it is exported in the session that starts Omarchy (your shell rc, or the environment of your display manager / WM). Since Omadroid already ships sensible quality defaults, this is optional.
🚀 Install
omarchy plugin add https://github.com/tug-benson/omadroid.git --enable
The widget appears in the right section of the bar (move it with
omarchy bar move com.github.tug-benson.omadroid --section <left|center|right>).
💡 Usage
- Plug the phone in over USB and accept the ADB authorization.
- Click the 📱 icon → the panel shows the phone preview.
- Click Open screen to launch the interactive scrcpy window (size is adjustable, ~6–8″ equivalent by default).
- Unlock the phone physically, then use it like a window.
WiFi mode (optional): in the panel, pick WiFi, enter the phone IP, click Connect. The first time, the phone must be plugged in over USB (the plugin enables TCP/IP via USB, then switches to WiFi).
⌨️ Keyboard shortcut (open screen directly)
The plugin can open the scrcpy window straight from a keybinding. Add it to
your Hyprland Lua config (~/.config/hypr/bindings.lua):
-- Free the combo used by the ChatGPT plugin, then bind it to Omadroid
hl.unbind("SUPER + SHIFT + A")
o.bind("SUPER + SHIFT + A", "Omadroid (open screen)", "$HOME/.config/omarchy/plugins/com.github.tug-benson.omadroid/scripts/omadroid.sh open")
open auto-detects the transport: it uses a plugged-in USB device, or falls
back to the saved WiFi IP. Set SCRCPY_OPTS (see Quality above) in the session
that starts Omarchy to tune it. Pick any free key combo — change
SUPER + SHIFT + A if that binding is already taken.
✨ Features
- USB by default, WiFi optional (remembers the last WiFi IP and mode).
- Auto-connect over WiFi when you open the panel and an IP is known.
- Multiple devices: if several phones are detected, a device picker lets you choose which one to mirror.
- Resolution toggle for the scrcpy window: 1080p / 720p.
- Preview (auto-refreshing screenshot) with Rotate (⟳) and Expand (▣) controls.
- Direct touch control: tap and swipe directly on the preview to drive the
phone (maps to
adb input tap/swipe, accounting for preview rotation). - Save snapshot: the 💾 button copies the current preview to
~/Pictures/omadroid-<timestamp>.png(handy for grabbing a clean wallpaper shot without the apps). - Battery level and a colored connection indicator in the status line.
⚙️ Configuration
Settings (WiFi IP, max size, mode) are persisted to
~/.config/omarchy/omadroid.conf.
| Setting | Description | Default |
|---|---|---|
| Mode | USB (default) or WiFi | usb |
| WiFi IP | Phone address in WiFi mode | (empty) |
| Resolution | --max-size of the scrcpy window (1080 or 720) |
1080 |
🔧 Troubleshooting
The phone is not detected (status: "Not connected"):
- Make sure USB debugging is enabled and you accepted the authorization prompt on the phone (Settings → Developer options).
- Try a different cable / port, then restart the ADB server:
adb kill-server && adb start-server adb devices - The widget only lists devices shown by
adb devicesasdevice.
WiFi mode won't connect:
- The first WiFi connection must happen while the phone is plugged in over
USB (the plugin runs
adb tcpip 5555through the USB link). After that, WiFi works on its own. - Check the IP is correct and the phone is on the same network as the PC.
- On Android 11+, you can instead pair via Wireless debugging (Developer options) so no USB bootstrap is needed.
- Manually verify with:
adb connect <ip>:5555.
Preview is blank / "Preview unavailable":
- The screen may be off — click Wake to turn it on.
- Over WiFi, enable USB debugging (Security settings) on the phone if you want the preview/controls to work without re-authorizing after each unlock.
"Open screen" does nothing:
scrcpymust be installed (pacman -S scrcpy).- A device must be connected (USB or WiFi) before opening.
- A typo in
SCRCPY_OPTScan make scrcpy exit immediately — test your flags from a terminal first.
Touch control on the preview does not react:
- The device must be connected and authorized.
- Over WiFi, inputs are blocked until the device is unlocked at least once, or USB debugging (Security settings) is enabled.
The widget does not appear in the bar:
- Run
omarchy plugin validate com.github.tug-benson.omadroidandomarchy restart shell. - Make sure the plugin is enabled:
omarchy plugin list.
The keyboard shortcut does nothing:
- Confirm the script path in your Hyprland bind matches the installed plugin directory.
- After editing the bind, reload Hyprland (or log out/in).
🗑️ Uninstall
omarchy plugin remove com.github.tug-benson.omadroid
📄 License
MIT — see LICENSE.