
Blue Star Smart AC Control
A cross-platform local service and control panel for controlling a Blue Star Smart AC from your laptop.
It runs a small Node.js service on 127.0.0.1:8765, talks to your configured AC provider, and gives you several local control surfaces:
- a Windows system tray menu for quick changes
- a Linux CLI and Omarchy status-bar plugin
- a browser panel at
http://127.0.0.1:8765/ - a command line shortcut for common controls
- an optional Android app and home-screen widget under
android/
Control Surfaces
Windows tray plugin
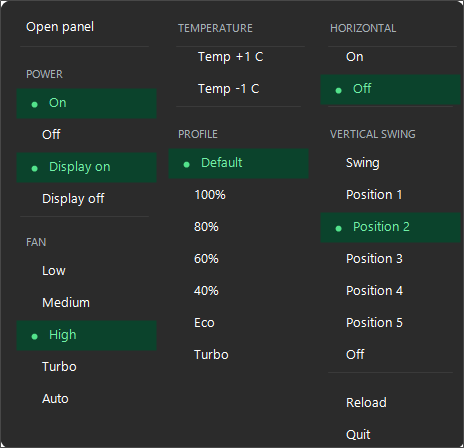
Localhost dashboard
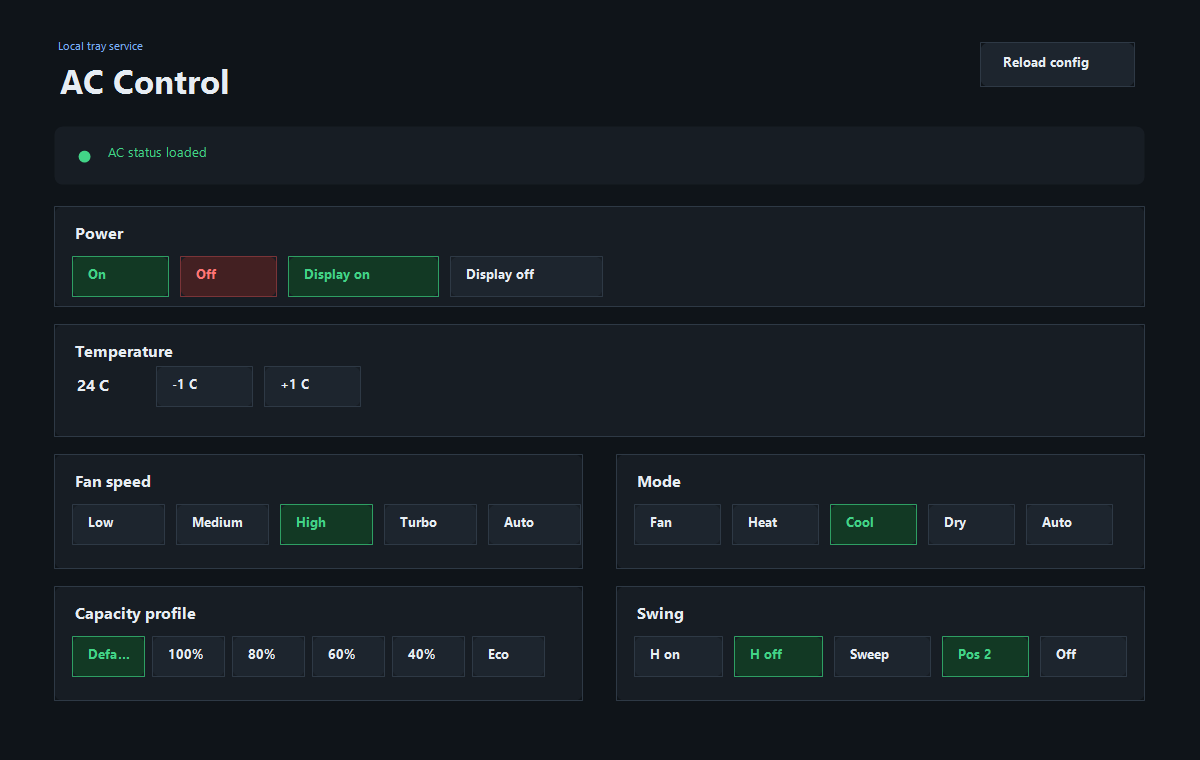
What You Can Control
- Power on/off
- Temperature up/down
- Display light on/off
- Fan speed: low, medium, high, turbo, auto
- Mode: fan, heat, cool, dry, auto
- Capacity profile: default, 100%, 80%, 60%, 40%, eco, turbo
- Horizontal swing on/off
- Vertical swing sweep, fixed positions, or off
- AC on/off timers from the web panel or CLI
- Config reload without restarting the tray
The web panel does not continuously poll AC status in the background. It reads AC status when the page loads, when you press refresh, and once after each command. On/off timer countdowns update in the panel after they are set.
Requirements
- Windows 10/11, or Linux with Node.js 18 or newer
- A Blue Star Smart AC account or a configured mock/local provider
- Local access to this project folder
Quick Start
-
Install dependencies:
npm install -
Create your environment file:
Copy-Item .env.example .env -
Edit
.envand add your Blue Star credentials:BLUESTAR_AUTH_ID=your-phone-number BLUESTAR_PASSWORD=your-password -
Review
config.json.For first-run testing, the included mock provider is the safest option because it lets you open the tray and web panel without sending commands to a real AC. To control your real AC, configure the
bluestar-cloudprovider and your device values. -
Start the local service:
npm start -
Open the web panel:
http://127.0.0.1:8765/ -
Start the tray app:
npm run tray
Linux And Omarchy
The Windows tray and Android app remain available. On Linux, the same Node.js
service is managed as a user systemd unit and the ac command is available
from ~/.local/bin.
Install the Linux integration from an Omarchy terminal:
./install-linux.sh
The installer copies the service to ~/.local/share/ac-control, installs the
configuration under ~/.config/ac-control, enables ac-control.service, and
installs the Omarchy plugin under ~/.config/omarchy/plugins/djsmanchanda.blue-star-ac.
Add the widget to the bar by adding { "id": "djsmanchanda.blue-star-ac" } to a layout
section in ~/.config/omarchy/shell.json; the shell hot-reloads the plugin.
Linux CLI examples:
ac status
ac status --json
ac on
ac off
ac 1+
ac set 27
ac timer 1h
The Omarchy panel includes a Setup button for the Blue Star account. Enter
the phone number used as your Blue Star username and password there; on Linux,
the credentials are stored in the desktop Secret Service keyring (encrypted at
rest and scoped to your user session), then the user service is restarted. They
are never stored in the plugin repository or passed as command-line arguments.
Reinstalling the Linux integration preserves the keyring entry and your
config.json. A legacy .env entry is supported as a migration fallback, but
new Linux setup writes to the keyring and removes those plaintext credential
lines.
Linux uses XDG paths by default. Edit
~/.config/ac-control/config.json; use the panel Setup button to save account
credentials. The secret-tool utility and an unlocked Secret Service keyring
are required for encrypted credential storage.
Override paths with AC_CONTROL_CONFIG, AC_CONTROL_CONFIG_DIR, or
AC_CONTROL_STATE_DIR when packaging or running multiple installations.
Inspect the service with systemctl --user status ac-control.service and its
logs with journalctl --user -u ac-control.service.
The Linux installer uses rsync to copy the runtime without repository Git
metadata. Node.js 18+, rsync, systemd --user, secret-tool, an unlocked
Secret Service keyring, and an Omarchy shell are required for the full Linux
integration.
Community plugin publishing
The repository root contains the marketplace manifest at manifest.json.
The namespaced Omarchy entry point is djsmanchanda.blue-star-ac.
Blue Star AC Omarchy panel
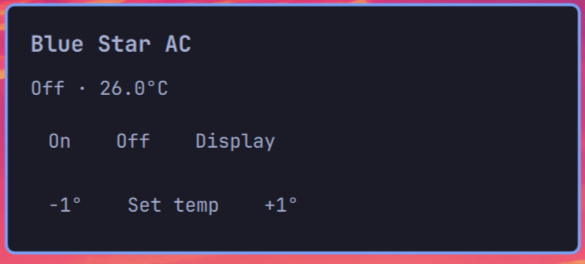
Validate a checked-out repository with:
omarchy plugin validate .
qmllint -I "$OMARCHY_PATH/shell" BarWidget.qml Panel.qml
The plugin runs inside the existing Omarchy shell and calls the user-installed
ac CLI. It does not start Quickshell, use elevated privileges, or make network
requests itself. The Node service performs the configured Blue Star cloud calls.
Installation uses a user systemd service and user-owned XDG directories; no
administrator elevation is required. Remove it with ./uninstall-linux.sh, which preserves your
configuration and credentials in ~/.config/ac-control.
Using The Tray
Run npm run tray to show the AC controls in the Windows system tray. The tray will start the local Node service automatically if nothing is already listening on the configured port.
The tray menu includes:
Open panelto open the browser UI- power and display controls
- temperature step controls
- fan, profile, and swing controls
Reloadto reloadconfig.jsonQuitto close the tray and stop the local service
Important: Quit is intended to stop this tool entirely. It sends POST /api/shutdown to the local service and then falls back to killing the tray-started process if needed.
Using The CLI
The package exposes an ac command. Link it once from this project folder:
npm link
Then start the local service and run:
ac status
ac on
ac off
ac display on
ac display off
ac 1+
ac 1-
ac 3+
ac 3-
ac set 27
ac on 1h
ac off 5m
ac timer 1h
ac timer 5m
ac timer 1h 5m
ac timer cancel
ac timer cancel on
ac timer cancel off
ac status prints the current AC settings, including power, temperatures, mode, fan, profile, display, swing, timers, timestamp, and raw reported state fields. Temperature step commands such as ac 1+, ac 1-, ac 3+, and ac 3- read the current AC status, then adjust the set temperature by that many degrees. ac set 27 sets the target temperature directly. ac on 1h schedules an on timer, ac off 5m schedules an off timer, and ac timer ... remains an off-timer shortcut. ac timer cancel cancels the off timer by default; pass on or off to cancel a specific timer. For Blue Star cloud devices this writes the AC-native ontimer or offtimer minutes field; other providers fall back to in-memory service timers that are cleared if the service is stopped or restarted.
Android App And Widget
The android/ folder contains a native Android app and widget. It supports both
the original laptop/LAN service and a direct-cloud mode that works while the
laptop is off. It includes:
- a settings screen for LAN mode or direct Blue Star cloud mode
- a compact 2-cell home-screen widget with a minimal live-state control and display-light toggle
- cached widget state so taps feel immediate while the cloud request completes
Build it from Android Studio by opening the android/ folder, or from a machine with the Android Gradle Plugin available:
cd android
gradle :app:assembleDebug
For laptop-free control, enable Direct cloud mode (no laptop) in the app and enter your Blue Star phone number, password, and device thing ID. The endpoint and region fields default to the Blue Star deployment values. Direct cloud mode logs in to Blue Star and uses the same AWS-IoT MQTT-over-WebSocket flow as the Node service; the laptop is not involved.
The phone number and password are encrypted with an Android Keystore AES-GCM key. The password field is cleared after saving and is never placed in a URL or command-line argument. Direct cloud status refreshes run once per minute only while the app is in the foreground. Widget taps perform one request on demand; the widget does not keep a background service alive.
LAN mode remains available for the original laptop service. Android cannot
reach a laptop service at 127.0.0.1 because that address points back to the
phone. To use LAN mode, run the service on an address reachable from your local
network, then enter that URL in the Android app, for example:
{
  "host": "0.0.0.0",
  "port": 8765
}
Then save a URL like this in the Android app:
http://192.168.1.23:8765
Only expose the service on a trusted private network. Requests from localhost are
allowed without a token. For LAN access, set AC_CONTROL_API_TOKEN in
~/.config/ac-control/.env; every non-local /api/ request must then include
Authorization: Bearer <token>. Enter the same token in the Android app's API
token field. The service does not provide HTTPS, so use it only on a trusted LAN.
Keep device id as ac unless you changed it in config.json.
The Android APK does not include account credentials. In direct cloud mode, they are entered by the user and protected by Android Keystore. In LAN mode, the Android app only talks to the configured service over your trusted LAN.
The home-screen widget uses a minimal four-button layout: AC On/Off and Display On/Off on the left, with ▲, temperature, and ▼ on the right. Tap AC On/Off to toggle AC power. Tap Display On/Off to toggle the display light. Tap ▲ or ▼ to adjust temperature.
If the AC is on but not in Cool mode, the widget shows Alt Mode plus the display state. Tapping ▲ or ▼ switches back to Cool mode and sets the temperature.
Android home-screen widgets do not receive continuous drag gestures, so the widget uses visible ▲ and ▼ tap zones instead of swipe. The Android app includes widget settings for System/Light/Dark theme and background opacity from 00% to 100%.
The widget is intentionally light: automatic background status refreshes are rate-limited to once every 45 minutes, including after device boot. Tapping widget commands can still read status after the command completes so the displayed state stays accurate. If the widget is installed, Android will wake the widget receiver after boot; there is no always-running foreground service.
Start Automatically With Windows
After setup, install the startup shortcut:
.\setup-startup.bat
At your next Windows sign-in, the tray app will start automatically. The tray starts the background service when needed.
If the tray does not appear after sign-in, check tray-startup.log in this project folder. The startup launcher writes one line for each hidden launch attempt and records PowerShell errors that would otherwise be invisible.
To remove startup behavior later, delete the shortcut that the setup script created in your Windows Startup folder.
Configuration
The app reads:
.envfor secretsconfig.jsonfor host, port, devices, and provider settingsconfig.example.jsonas a reference configuration
Default local address:
{
  "host": "127.0.0.1",
  "port": 8765
}
Keep the service bound to 127.0.0.1 unless you have a specific reason to expose it. The tray and web panel are designed for local laptop use.
Blue Star Cloud Notes
The Blue Star cloud provider uses AWS IoT MQTT over WebSocket. Typical topics are:
- normal control publish topic:
$aws/things/<thing-id>/shadow/update - force-sync topic:
things/<thing-id>/control - state topic:
things/<thing-id>/state/reported - AWS IoT endpoint:
a26381dl7mudo4-ats.iot.ap-south-1.amazonaws.com - AWS region:
ap-south-1
Normal controls are published as AWS IoT Shadow desired state:
{
  "state": {
    "desired": {
      "pow": 1,
      "ts": 1780500000000,
      "src": "anmq"
    }
  }
}
The ts value is a UTC Unix timestamp in milliseconds on normal desired/reported state payloads. It is the command/report timestamp, not the timer duration. Blue Star timers are represented by reported ontimer and offtimer fields in minutes, for example 68 means about 68 minutes remaining. The web panel displays both timer fields and the reported ts.
Current status is read by subscribing to things/<thing-id>/state/reported and publishing { "fpsh": 1 } to things/<thing-id>/control.
Local API
The service exposes these localhost endpoints:
GET  /api/health
GET  /api/devices
POST /api/reload
POST /api/shutdown
GET  /api/devices/ac/status
POST /api/devices/ac/commands
GET  /api/devices/ac/timer
POST /api/devices/ac/timer
DELETE /api/devices/ac/timer
GET  /api/devices/ac/timers/on
POST /api/devices/ac/timers/on
DELETE /api/devices/ac/timers/on
GET  /api/devices/ac/timers/off
POST /api/devices/ac/timers/off
DELETE /api/devices/ac/timers/off
Example command:
{
  "command": "setTemperature",
  "value": 24
}
Supported AC commands:
turnOnturnOffsetTemperaturesetFanSpeedsetModesetDisplaysetCapacityProfilesetHorizontalSwingsetVerticalSwing
Timer request:
{
  "durationSeconds": 3900
}
Timer response:
{
  "timer": {
    "dueAt": "2026-06-10T13:05:00.000Z",
    "durationSeconds": 3900,
    "remainingSeconds": 3900,
    "command": "turnOff"
  }
}
For Blue Star cloud devices the timer API sends setOnTimer with ontimer minutes or setOffTimer with offtimer minutes and the normal ts command timestamp. Use DELETE /api/devices/ac/timers/on or /timers/off to send the matching timer value as 0. The legacy /api/devices/ac/timer endpoint is kept as an off-timer alias for the CLI. Providers without a native timer template use local service timers that send the normal turnOn or turnOff command when the countdown finishes.
Troubleshooting
If the web panel does not open, check that the service is running:
npm start
If the tray says the service is already running, open:
http://127.0.0.1:8765/api/health
If commands do not reach the AC, confirm your .env credentials and config.json provider settings.
Logs are written to:
service.logserver.out.logserver.err.log
License
Apache-2.0. See LICENSE.