
NymVPN
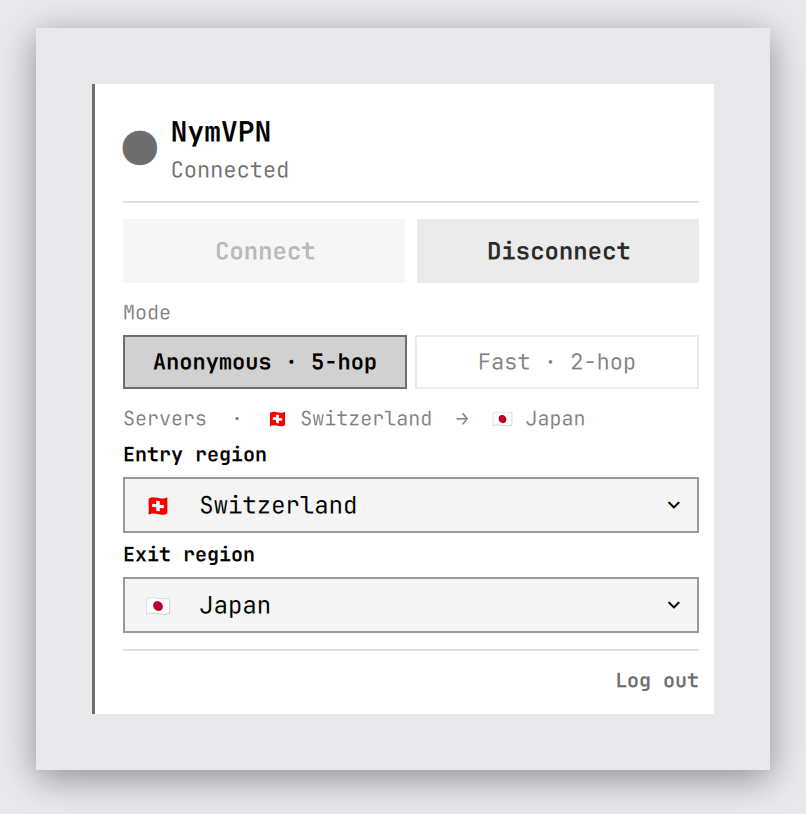
Control NymVPN from the Omarchy (Quattro) bar. The widget
shows live tunnel status; clicking it opens a panel to connect/disconnect,
switch between Anonymous (5-hop mixnet) and Fast (2-hop WireGuard) mode,
and pick the entry and exit regions from a searchable, flag-labelled
country list — all by driving the official nym-vpnc command-line client.
The plugin only detects and controls an already-configured account. It never asks for or handles your recovery phrase — you log in yourself with the official CLI in a terminal (see Logging in).
Setup in four steps: (1) install the
nym-vpncCLI +nym-vpnddaemon, (2) start the daemon, (3) add the plugin, (4) log in from a terminal. Full commands are in Installation below, and the panel shows a copy-paste card for whichever step is still outstanding.
Requirements
- Omarchy (Quattro bar). This is an Omarchy bar-widget plugin.
- A NymVPN account. Create one and get your recovery phrase at https://nym.com — see https://nym.com/download/linux for the client.
- The
nym-vpncCLI andnym-vpnddaemon. The plugin is a front-end that drives the official CLI; it makes no network calls of its own.
Installation
Follow these steps in order. The panel also shows a setup card with the exact command for whichever step is still outstanding (with a Copy button) so you can complete setup without leaving Omarchy.
1. Install the CLI and daemon
On Arch / Omarchy the daemon and GUI packages do not include the nym-vpnc
CLI, so install the CLI package (nym-vpnc-bin) explicitly:
yay -S nym-vpnc-bin nym-vpnd-bin # CLI + daemon (nym-vpn-app-bin is the optional GUI)
2. Start the daemon
nym-vpnd is a privileged system service and must be running for nym-vpnc to
work:
sudo systemctl enable --now nym-vpnd
3. Add the plugin to Omarchy
omarchy plugin add https://github.com/megabyte0x/nym-vpn.git --enable
The nym widget appears in the bar (right section by default). Left-click it to
open the panel.
4. Log in from a terminal
Log in yourself with the official CLI — the plugin never asks for or handles your recovery phrase (see Logging in for why):
nym-vpnc account set <your recovery phrase> # run in your own terminal
Then reopen the panel (or press r); it will detect the configured account.
You're ready to Connect.
When nym-vpnd gates calls behind a password prompt (polkit), the panel asks
you to approve it — approving per action is the recommended default. See
Authentication prompts for the trade-offs of
the optional passwordless rule.
Logging in
The plugin does not accept your recovery phrase and has no login field. The
official nym-vpnc account set takes the mnemonic only as a positional
command-line argument (no stdin, file, or environment-variable input), which
would place the phrase in that process's argv (/proc/<pid>/cmdline) for the
duration of the call. Rather than take on that credential exposure, the plugin
leaves login entirely to you:
nym-vpnc account set <your recovery phrase> # run in your own terminal
Running it yourself keeps that brief argv exposure under your direct control and
out of a background GUI process. When no account is configured, the panel simply
shows this command (with a Copy button for the nym-vpnc account set prefix)
and asks you to complete it in a terminal, then press r. Once an account is
configured, the panel detects it and offers Log out (nym-vpnc account forget). All panel actions — status, connect, disconnect, tunnel,
gateway, and account forget — carry no secrets.
Authentication prompts (polkit)
On current nym-vpnd builds the read-only status call is not gated, so a
shared background service polls status about every 10 seconds to keep the
bar dot live and identical across every monitor. Privileged calls
(connect / disconnect) may still be gated behind a polkit action
(com.nymvpn.vpnd.unix-access), prompting for your password per action.
If a status call ever comes back authentication required (a daemon that
gates reads too), the plugin stops background polling automatically and
falls back to on-demand refresh — talking to the daemon only when you open the
panel, press r, or click Connect/Disconnect — so you are never spammed with
prompts. When authentication is needed, the panel asks you to approve the
system prompt; approving per action is the recommended default.
Advanced / optional — not a setup step. If you fully understand the trade-off, you can allow the active local user to reach the daemon without a password prompt by installing a polkit rule. This weakens the daemon's access control (any process running as your active local user could then drive the VPN without authenticating), so it is not recommended and the plugin does not offer to install it for you. If you choose to, write it yourself:
sudo tee /etc/polkit-1/rules.d/49-nymvpn.rules >/dev/null <<'EOF'
polkit.addRule(function(action, subject) {
  if (action.id == "com.nymvpn.vpnd.unix-access" && subject.active && subject.local) {
    return polkit.Result.YES;
  }
});
EOF
Then log out/in (or restart your polkit agent). Skip this if you prefer to approve each prompt.
Usage
- Left-click the
nymwidget to open/close the control panel. - Middle-click to force a status refresh.
- Log in from a terminal with
nym-vpnc account set <your recovery phrase>(see Logging in). The panel does not accept the phrase; it only detects a configured account and offers Log out to forget it. - In the panel: Connect / Disconnect and choose Mode.
- Pick your Entry region and Exit region from the two dropdowns. Each opens a searchable list of the countries NymVPN currently has gateways in, shown with a flag and full name — just type to filter (by name or code) and click to select; the choice is applied immediately. Three smart options lead the list: ✨ Auto (recommended) (let NymVPN choose, excluding your own country), ⚡ Fastest (measured) (see Fastest regions) and 🎲 Random gateway. The available countries follow the active mode (WireGuard gateways for Fast, mixnet gateways for Anonymous).
- Choose Local network: see Local network access.
- Use Re-test under the region pickers to measure again at any time.
- The Servers line always reports the route the tunnel is actually using, not just the stored setting. Changing a region while connected rebuilds the tunnel so the new selection really takes effect — otherwise the daemon would keep routing over the old gateways and the panel would describe a route you were not on.
- Press r to refresh, Esc to close.
The bar dot reflects the tunnel state: filled = connected, half = connecting / disconnecting, hollow = disconnected / error. Colour follows your theme accent (connected) or urgent (error).
Local network access
By default nym-vpnd sends everything through the tunnel and blocks your
local network. That breaks printers, shared drives, casting and
clipboard-continuity tools while you are connected.
The panel exposes the daemon's own policy as an Allow LAN / Block LAN
toggle (nym-vpnc lan get / nym-vpnc lan set):
- Allow LAN keeps devices on your own network reachable. All other traffic still goes through the tunnel.
- Block LAN is the stricter default — prefer it on untrusted networks.
This covers your local network only — the daemon's allow-list is RFC1918, link-local and multicast. Addresses outside those ranges stay in the tunnel.
Configure
omarchy bar move io.github.megabyte0x.nym-vpn --section right
Remove
omarchy plugin remove io.github.megabyte0x.nym-vpn
Fastest regions (why NymVPN can feel slow)
NymVPN's own Auto selection scores gateways by load and uptime, but it is latency- and geography-blind — and it deliberately excludes your own country for privacy. Measured from India, Auto routed entry Dubai [AE] → exit Baku [AZ]: 474 ms RTT, 3.0 MB/s, while idle gateways sat in Mumbai and Singapore. Latency throttles single-stream TCP, so this is usually what "NymVPN is slow" actually means.
⚡ Fastest (measured) in either region dropdown fixes that from the client side:
- works out roughly where you are (timezone, falling back to your locale),
- shortlists the nearest countries that actually have gateways, by great-circle distance,
- pings a couple of healthy gateways in each, concurrently (~1.5 s),
- applies the winners — pinning the exact measured nodes with
--entry-id/--exit-id.
Measured on the same connection, the resolved route ran at 75 ms / 10.9 MB/s and 13–16 MB/s on a later run — roughly 5× the throughput of Auto.
You can also resolve it without opening the panel — handy for a keybind:
qs -p "$OMARCHY_PATH/shell" ipc call io.github.megabyte0x.nym-vpn fastest
Two deliberate behaviours are worth knowing:
- Auto is left exactly as it was. Fastest often puts the entry hop in your
own country, which is precisely what Auto's
exclude_user_countrydefault avoids. That is a real privacy tradeoff, so it is an explicit, separate choice — never a silent redefinition of Auto, and the panel says so whenever the measured winner turns out to be your own country. - You must be disconnected to measure. While the tunnel is up, the killswitch routes every packet through it, so a ping to a gateway actually travels entry → exit → target: the ranking would describe the exit's neighbours, not yours (a probe from a Singapore exit rated Cambodia at 275 ms and gateways in the user's own country at 443 ms). Selecting Fastest while connected therefore changes nothing and tells you to disconnect first, rather than applying a guess and rebuilding your tunnel for it.
Pinning the exact node matters too: constraining only the country leaves the daemon free to re-roll inside it, which produced an exit at 390 ms / 2.5 MB/s while a probed node in that same country answered in 43 ms. When nothing could be measured, the plugin falls back to a plain country constraint instead.
Develop
Pure command-building and output-parsing logic lives in Model.js and is unit
tested without Qt:
node tests/model-test.js
omarchy plugin validate .
qmllint -I "$OMARCHY_PATH/shell" BarWidget.qml Panel.qml
License
MIT — see LICENSE.