
Quattro 4x4
Enlarge a photo four times without it going soft. A native panel for the Omarchy shell that runs Real-ESRGAN on your own GPU — no uploads, no accounts, no subscription, nothing leaves your machine.
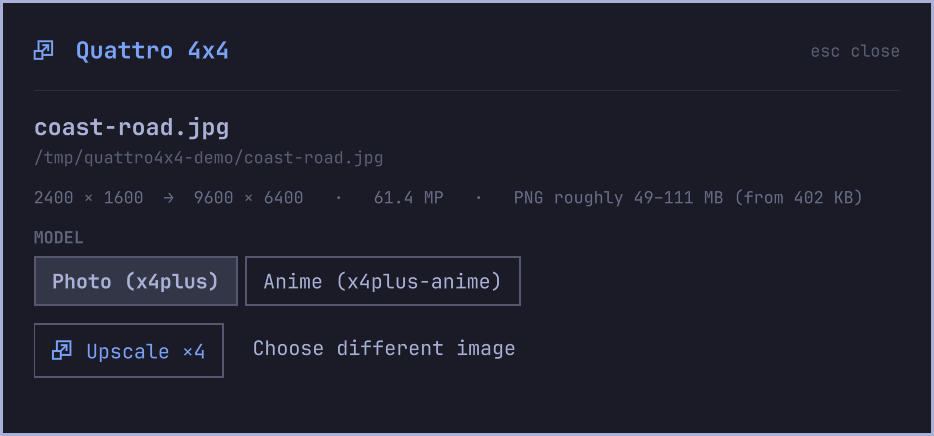
Pick an image, choose a model, press Upscale. The result is written next to the original as a PNG. Nothing is ever overwritten.
Contents
- What it actually does
- Before and after
- How the upscaling works
- The two models
- Why 4× and nothing else
- What you get out
- How long it takes
- Install
- Using it
- Requirements
- Privacy
- Troubleshooting
- Remove
- Credits
What it actually does
Ordinary image resizing — what your photo editor does when you drag a corner — is interpolation. To invent a new pixel it averages the ones around it. That is why an enlarged photo looks soft: no new detail is created, the existing detail is just smeared over a larger area.
Quattro 4x4 does something different. It runs the image through a neural network that has been trained on millions of before-and-after pairs, so it has learned what real photographic detail looks like — the texture of skin, fabric, foliage, brick, hair, the shape of a letterform. Instead of averaging, it reconstructs plausible detail at the larger size.
The practical difference: edges stay crisp, textures stay textured, and small text often becomes readable again. A 2400 × 1600 photo becomes 9600 × 6400 and still looks like a photograph rather than a blurry one.
Before and after
Here is the difference on a real photograph — a small, ordinary JPEG of the sort you would find in a folder from years ago:
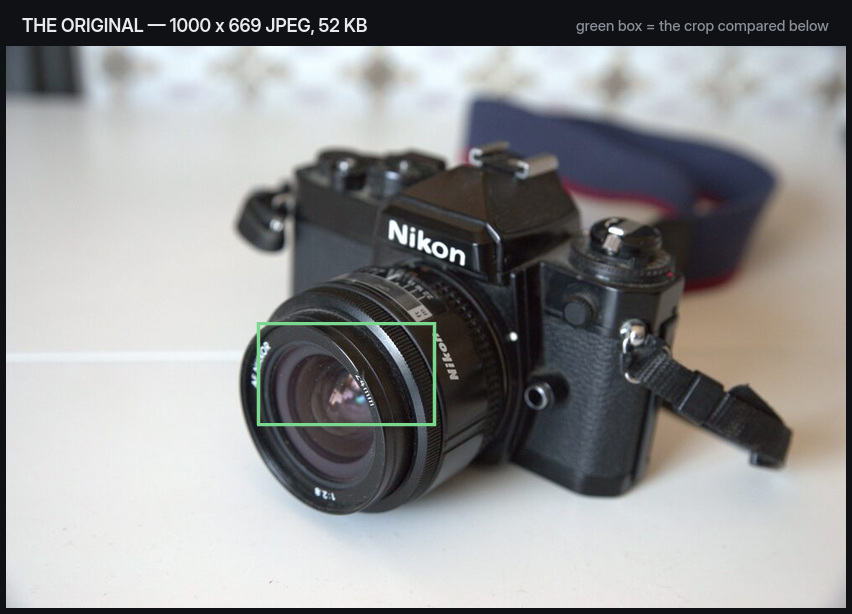
Below, that marked area at 1:1 — the same pixels, side by side at the same size. The top half is the original enlarged four times the ordinary way, the bottom half is the same enlargement through Quattro 4x4:
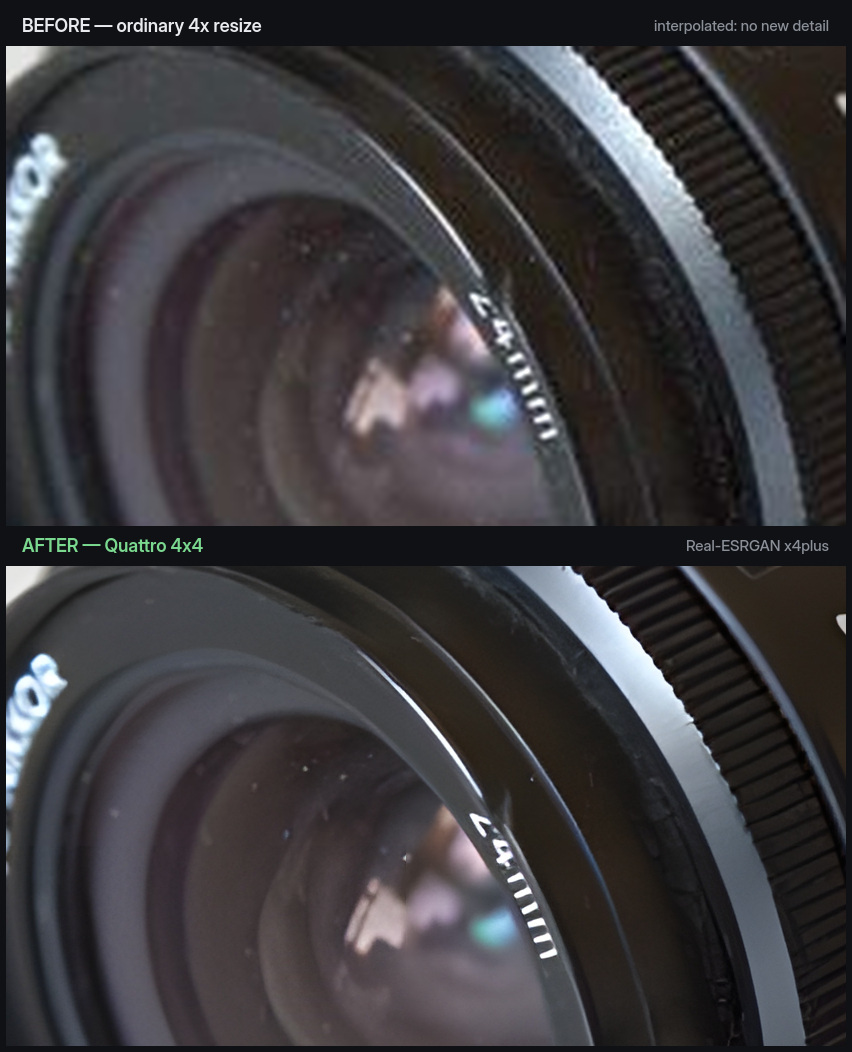
Look at the engraved 24mm, the milled ridges on the focus ring, and the
edge of the front element. The ordinary resize has nothing to work with,
so it smears what is there; the model reconstructs the edge and the
texture, and the lettering becomes legible again.
Both halves are exactly the same 210 × 120 region of the original blown up to 840 × 480 — nothing is cropped tighter or sharpened afterwards. The whole 4000 × 2676 upscale took under five seconds on a mid-range GPU.
How the upscaling works
Four pieces are involved. You do not need to know any of this to use the app, but here is what is under the bonnet.
Real-ESRGAN — the model
Real-ESRGAN is the neural network doing the work. It is a GAN (generative adversarial network): during training, one network learned to enlarge images while a second network learned to spot which outputs were fakes. Training them against each other pushes the first towards output that is convincing rather than merely mathematically close to the original — which is exactly what you want, because a mathematically-optimal upscale tends to look blurry.
The "Real" part matters. Earlier super-resolution models were trained on images shrunk in a clean, artificial way, so they worked beautifully on test data and fell apart on real photographs. Real-ESRGAN was trained against synthetic degradations — deliberately applied JPEG artefacts, sensor noise, blur, ringing, resizing damage, in random combinations — so it expects the mess that real images actually carry. It repairs some of that damage on the way up. That is why a compressed JPEG off a phone or a scan of an old print often comes back looking better, not just larger.
It also means the model has an opinion. It is not recovering detail that was truly there; it is generating detail consistent with what it learned. For photography and illustration that is usually what you want. For anything forensic or evidential — a licence plate, a document, a medical image — it is the wrong tool, because the fine detail it adds is invented, however plausible it looks.
ncnn — the engine
The original Real-ESRGAN is Python and PyTorch, which means a multi- gigabyte install and a CUDA-shaped dependency on NVIDIA. Quattro 4x4 uses the ncnn port instead — a compact C++ inference engine with no Python at all. The whole backend is one binary plus the model weights.
Vulkan — why any GPU works
ncnn runs the network through Vulkan compute shaders. Vulkan is a vendor-neutral graphics and compute API, so the same binary runs on AMD, Intel Arc and NVIDIA alike. No CUDA, no ROCm, no vendor SDK — if your GPU has a working Vulkan driver (standard on Omarchy), it works.
Tiling — why big images do not run out of memory
A 12-megapixel photo at 4× is 192 million output pixels, far more than fits in video memory at once. The backend automatically splits the image into tiles, processes them one at a time, and stitches the result back together with overlapping edges so no seams show. This is why the progress bar sometimes appears to pause and why very large images take minutes rather than seconds — but it is also why they succeed at all.
The two models
| Model | Best for |
|---|---|
Photo (realesrgan-x4plus) |
Photographs, scans, anything from a camera. The general-purpose choice. |
Anime (realesrgan-x4plus-anime) |
Drawings, cel animation, comics, flat-shaded illustration. |
The Anime model is tuned for large areas of flat colour bounded by clean line work. Point it at a photograph and skin and foliage go waxy. Point the Photo model at line art and it tends to add texture where the artist wanted none. If in doubt, use Photo.
The same 1:1 crop of a painted illustration — a 640 × 359 JPEG, the sort of small file you end up needing four times the size — through both:
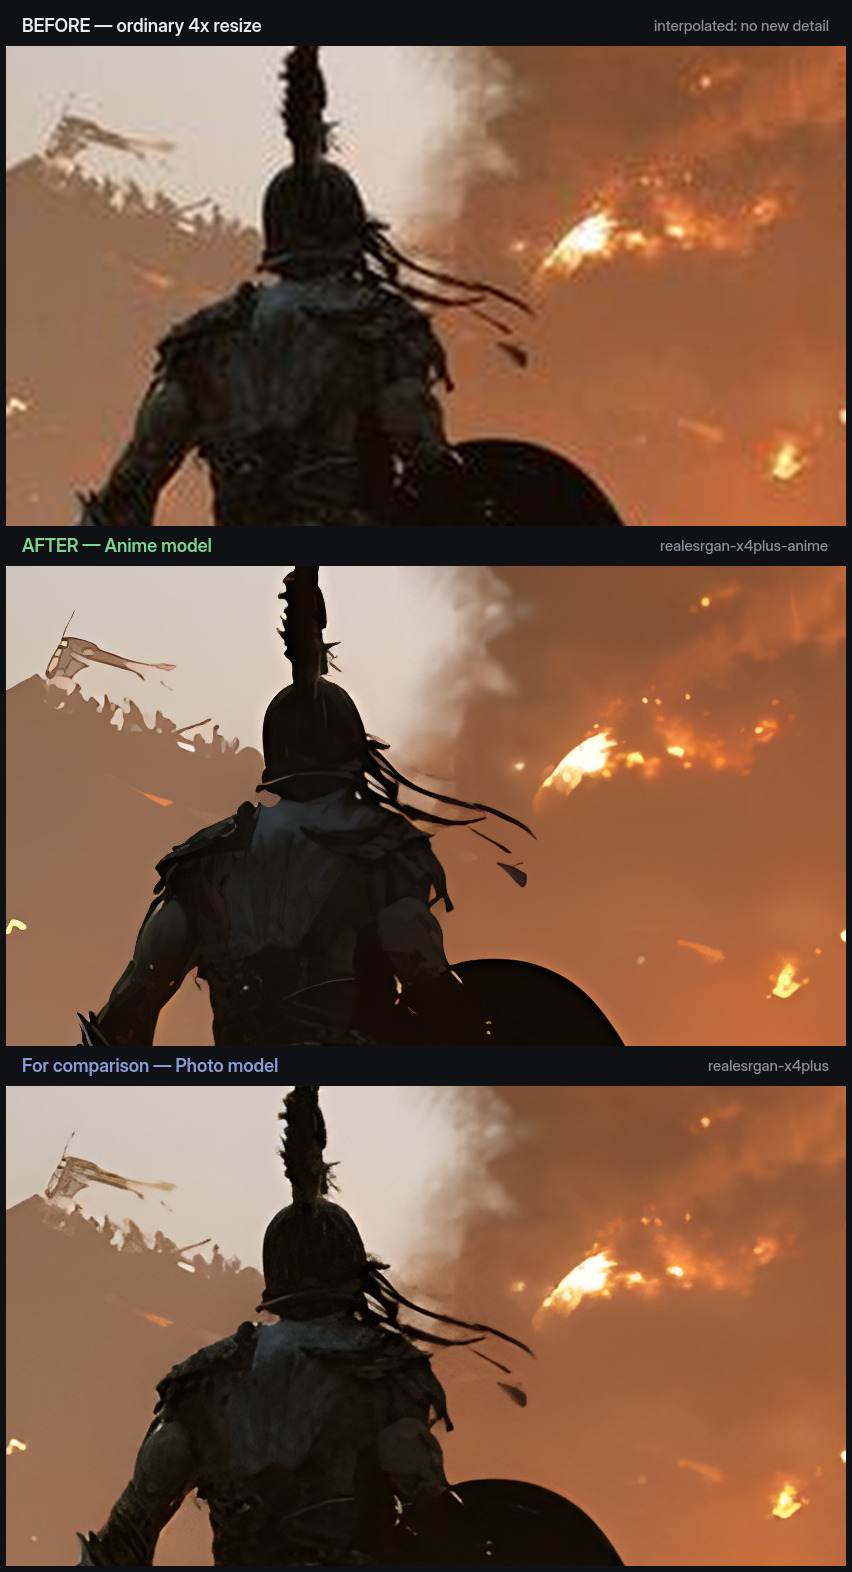
The ordinary resize leaves the crest, the armour and the distant ranks along the ship soft, because there is nothing there to sharpen. Both models rebuild them. The difference is the handling: the Anime model redraws the scene as clean shapes with hard edges and flat, calm colour, while the Photo model resolves the same detail but keeps the brushwork and the grain in the sky. Neither is wrong here — which one you want is what the choice is for.
Both are included with the backend — there is nothing extra to download.
Why 4× and nothing else
Because that is the only size these models exist at.
A super-resolution model's scale factor is baked into its trained weights.
realesrgan-x4plus and realesrgan-x4plus-anime ship weights for 4× and
no other factor. The command-line tool advertises a -s 2 option, but for
these two models asking for 2× does not give you a 2× upscale — it
returns a crop of the 4× render. Quattro 4x4 therefore only offers what
the weights on disk can actually do, so the panel can never present you a
factor that would silently produce a broken image.
If you want a smaller enlargement, upscale at 4× and then resize the result down in any image editor. Going 4×-then-down gives a better result than a direct 2× resize would have, because the detail is reconstructed first and discarded second.
What you get out
The result is written beside the original, named <original>_x4.png.
An existing file is never overwritten — a name already taken gets -2,
-3 and so on.
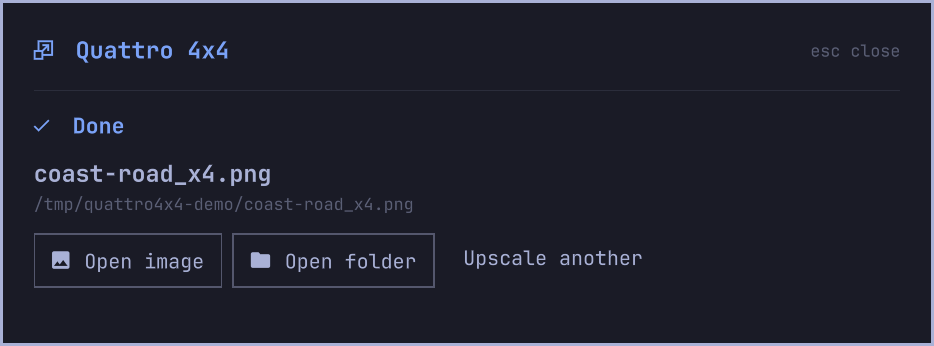
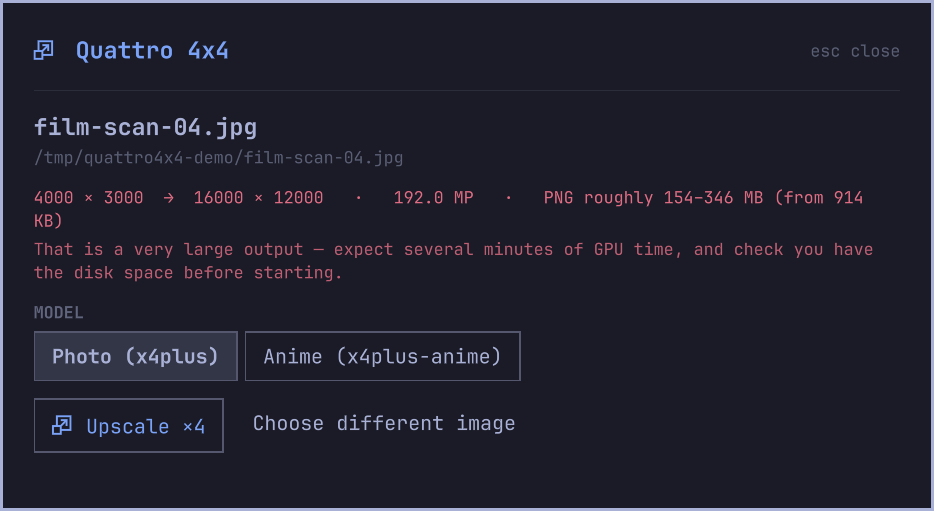
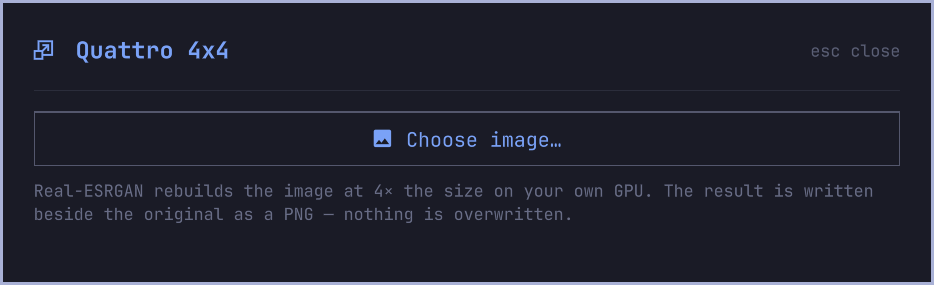
Output is always PNG, which is lossless and therefore large. Before you start, the panel tells you exactly what you are in for — the line under the filename in the screenshot at the top of this page.
Dimensions and megapixels are exact. The file size is given as a range because PNG compression depends on the picture: smooth photographic content packs down further than sharp-edged graphics. Measured across real images, output landed between 0.8 and 1.8 bytes per pixel:
| Source | Output | Size | Bytes/pixel |
|---|---|---|---|
| Photograph | 4124 × 4000 (16.5 MP) | 13.9 MB | 0.84 |
| Photograph | 9600 × 6400 (61.4 MP) | 50.7 MB | 0.83 |
| Illustration | 4800 × 3452 (16.6 MP) | 22.8 MB | 1.37 |
| UI screenshot | 4000 × 2500 (10.0 MP) | 17.1 MB | 1.71 |
Expect a big jump in file size. A 402 KB JPEG became a 50.7 MB PNG in the table above — roughly 125×. That is normal: you are going from a lossy format at one size to a lossless one at sixteen times the pixel count.
Past 100 megapixels of output the panel says so plainly, because that is where a job stops being quick:
How long it takes
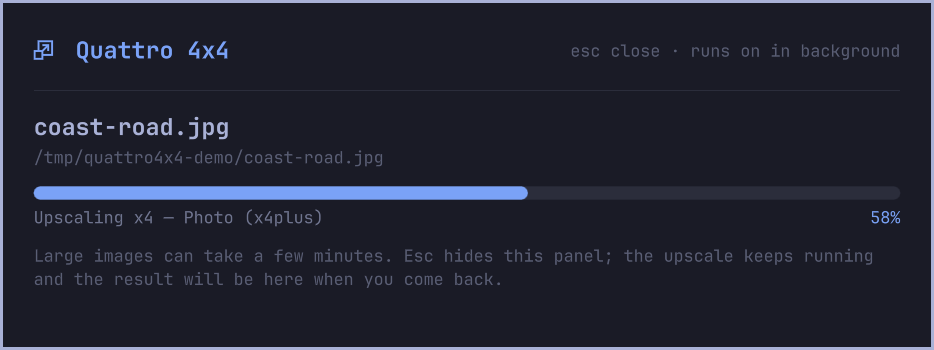
It scales with the input size, not the output. As a rough guide on a mid-range discrete GPU, budget around ten seconds per megapixel of input, so a 12 MP photo is a couple of minutes. An integrated GPU will be slower.
The upscale keeps running if you dismiss the panel — press Esc, get on with something else, and you will get a notification when it finishes. Reopening the panel mid-run shows the progress bar where you left it.
Install
curl -fsSL https://raw.githubusercontent.com/28allday/quattro-4x4/main/install.sh | bash
That installs the upscaling backend, the handful of small tools the panel uses, the Nautilus right-click entry, and registers and enables the plugin.
If you would rather install the plugin on its own:
omarchy plugin add https://github.com/28allday/quattro-4x4.git --enable
This route skips the installer, so nothing else is set up — but the panel notices, tells you what is missing and what each piece is for, and offers to install it all for you:
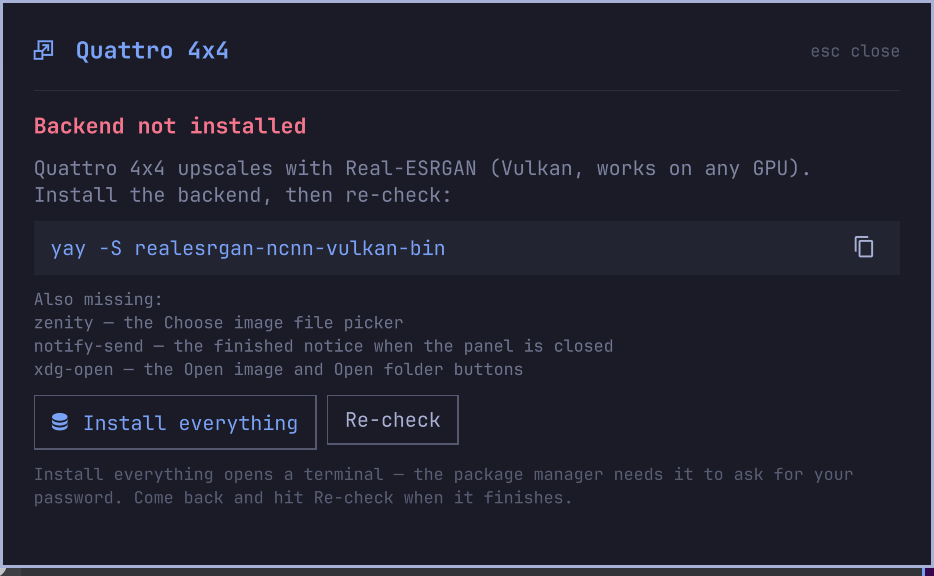
Install everything opens a terminal, because the package manager needs one to ask for your password.
What gets installed
| Piece | Why |
|---|---|
| Real-ESRGAN backend (binary + model weights) | The upscaler itself |
zenity |
The Choose image file picker |
libnotify |
The notification when a run finishes with the panel closed |
xdg-utils |
The Open image and Open folder buttons |
imagemagick |
Reading image dimensions for the size preview |
jq |
Reading the backend's capabilities |
The last two are part of the Omarchy base install, so they are normally already present.
The backend is not a package. The installer builds the engine from
source: it clones
Real-ESRGAN-ncnn-vulkan
at one exact pinned commit (submodules fixed by that commit too) and
compiles it on your machine, so the executable you run is built from source
anyone can read, at the revision this plugin was reviewed with — with two
deliberate, equally pinned exceptions, both decoders the 2022 tree vendors
with known input-reachable CVEs: libwebp is checked out at its v1.6.0
release commit (the vendored revision predates the CVE-2023-4863
out-of-bounds-write fix), and both stb headers are replaced from a pinned
stb commit, each verified against a SHA-256 committed here — stb_image.h
v2.30 (the vendored v2.26 predates the CVE-2021-28021 malformed-JPEG
bounds fix) and stb_image_write.h v1.16, bumped alongside it so the whole
stb surface is current. The model weights are trained data — there is no source
to build them from — so they come from upstream's release, and the
installer refuses them unless their SHA-256 matches the checksum committed
in this repository. Everything lands in
~/.local/share/quattro4x4/backend/; no root beyond the ordinary pacman
step for missing build tools (from git, cmake, make, gcc,
glslang, vulkan-headers — only what you lack), and no AUR helper
anywhere. The build takes a few minutes, once.
If you already have realesrgan-ncnn-vulkan on your PATH — your own
build, or the AUR package — the plugin uses yours and builds nothing. Worth
knowing if that is the AUR realesrgan-ncnn-vulkan-bin or upstream's 2022
prebuilt: those binaries statically link the pre-fix libwebp, so opening
WebP files through them carries the CVE above. This installer's own build
does not.
Using it
Click the bar icon — the panel opens top-right:
Bind a key in ~/.config/hypr/bindings.lua:
o.bind("SUPER + ALT + U", "Quattro 4x4", "omarchy-shell shell toggle nosignal.quattro4x4")
Right-click in Files. Right-click any PNG, JPEG or WebP in Nautilus and choose Upscale with Quattro 4x4. The panel opens with that image already loaded and the size preview filled in, so it is one more click to run. The entry appears only for a single image in a format the backend can read — it stays out of the way otherwise.
From a script or terminal:
omarchy-shell shell toggle nosignal.quattro4x4              # open the panel
omarchy-shell shell summon nosignal.quattro4x4 \
  '{"path": "/path/to/image.jpg"}'                          # open it on a file
All the upscaling lives in upscale.sh, which you can run by hand:
./upscale.sh run input.jpg realesrgan-x4plus 4
Keyboard
| Key | Does |
|---|---|
Esc or Q |
Close the panel. A running upscale carries on. |
Enter |
The main action of whatever is on screen — choose, upscale, open the result |
Requirements
- Omarchy 4 — this is an omarchy-shell plugin, and the whole interface
lives in the shell. On other systems, use
realesrgan-ncnn-vulkandirectly from the command line instead. - A GPU with a working Vulkan driver — AMD, Intel or NVIDIA. Most of the time this is already true.
- Roughly 100 MB of disk for the backend and its model weights, plus room for the results, which are considerably larger than the originals.
Privacy
Everything happens on your machine. No image is uploaded, no network request is made, no account exists, and the app works with the network switched off. The only thing that touches the internet is installing the backend in the first place.
Troubleshooting
"Backend not installed" — press Install everything, or run
bash ~/.config/omarchy/plugins/nosignal.quattro4x4/upscale.sh install-deps
yourself and press Re-check.
The Choose image button is greyed out — zenity is missing. The panel
lists it under the missing pieces with a button to install it.
The upscale failed with no useful message — run it by hand to see the backend's own output:
~/.config/omarchy/plugins/nosignal.quattro4x4/upscale.sh \
  run /path/to/image.jpg realesrgan-x4plus 4
The usual cause is running out of GPU or system memory on a very large image.
The photo model stalls mid-run or produces a black image (some AMD iGPUs) — on some integrated GPUs (seen on Ryzen "Renoir"/Vega 8) the photo model at the automatic tile size can hang the GPU's compute queue: progress stops and the kernel resets the GPU. The plugin detects the stall on its own, kills the run, and retries once with smaller tiles, which is known to get these GPUs through. If even the retry stalls, run it by hand with a smaller tile size:
QUATTRO4X4_TILE=64 ~/.config/omarchy/plugins/nosignal.quattro4x4/upscale.sh \
  run /path/to/image.jpg realesrgan-x4plus 4
Smaller tiles give the same result on almost every image, just slower; in the rare case you see visible seams, raise the number.
On the same GPUs the run can also finish — sometimes suspiciously fast —
but write a corrupted result: the output is pure black or pure white.
The plugin cannot tell that apart from a good run, so nothing retries
automatically. The fix is the same tile size, made permanent: create
~/.config/environment.d/quattro4x4.conf containing
QUATTRO4X4_TILE=100
then log out and back in. That applies to every run — the panel, the keybinding and the Nautilus right-click alike — and skips the 120-second stall wait entirely. If 100 still misbehaves on your GPU, go lower (64); if you ever see visible seams, raise it.
The right-click entry is missing — Nautilus only loads extensions at
start-up. Run nautilus -q and open it again.
The result is enormous — that is expected; see What you get out. Convert to JPEG afterwards if you do not need lossless.
Remove
omarchy plugin disable nosignal.quattro4x4
omarchy plugin remove nosignal.quattro4x4
rm ~/.local/share/nautilus-python/extensions/quattro4x4.py   # the right-click entry
Beyond its own entries in ~/.config/omarchy/shell.json — which disable
clears; run it a second time if the bar icon was already gone — the plugin
writes nothing anywhere except the upscales you asked for, which stay
where they were written. If you added the keybinding, take the o.bind
line back out of ~/.config/hypr/bindings.lua.
The installed packages are ordinary system packages and other things may use them, so removing them is a separate decision:
rm -rf ~/.local/share/quattro4x4 # the backend and its model weights
(If you installed realesrgan-ncnn-vulkan yourself instead — from the AUR
or a manual build — removing it is yours to do the way it went on.)
Credits
The hard part is not this panel — it is the model and the engine underneath it.
- Real-ESRGAN by Xintao Wang and colleagues — the super-resolution model. BSD-3-Clause.
- Real-ESRGAN-ncnn-vulkan — the C++/Vulkan port that makes it run anywhere without CUDA.
- ncnn by Tencent — the inference engine.
Quattro 4x4 packages these into the Omarchy shell. It does not bundle or modify them; the engine is built from upstream's source at a pinned commit, and the model weights come from upstream's own release, pinned by checksum.
Licence
MIT — see LICENSE.